Tuesday, April 21, 2009

Chinese Tea eggs

Hi everyone!

I used to eat these eggs all the time when I was young. They were everywhere in China! Food vendors on every street would have a pot of tea eggs simmering away. Each egg used to something like 10 cents...and I would ride on the back of my mom's little scooter and munch away at these. I absolutely loved them and have always wanted to know how to make them. The tea flavor give a plain hard boiled egg a delicious edge, and it's super easy to make!

I found this recipe on Steamy Kitchen written by Jaden Hair, who in turn got it from Appetite for China, a fabulous blog written by Diana Kuan. After reading her blog, I was inspired to make more Asian foods around the house... I hope you give these eggs a try, they are so yummy and I am sure you will love them!


Here is what you will need:

6 eggs
3/4 cup soy sauce
2 star anise
2 tablespoons black tea (or 2 tea bags)
1 cinnamon stick
1 teaspoon sugar
1 tablespoon Sichuan peppercorn (optional)
2 strips dried tangerine or mandarin orange peel (optional)

  1. Place the eggs in a medium pot and fill with water to cover the eggs by 1-inch or so.
  2. Bring the pot to a boil, lower the heat and let simmer for 3-5 minutes.
  3. Remove the eggs (leaving the water in the pot) and cool the eggs in a ice bath or under running cool water.
  4. Use the back of a teaspoon, gently tap the eggshell to crack the shell all over. The more you tap, the more intricate the design.
  5. To the same pot with the boiling water, return the eggs and add in the remaining ingredients. Bring the mixture to a boil and immediately turn the heat to low.
  6. Simmer for 40 minutes, cover with lid and let eggs steep for a few hours to overnight.
  7. The longer you steep, the more flavorful the tea eggs will be. I was impatient and steeped it only for 3 hours, most people steep for 5+ hours, even overnight.
  8. When you peel the egg shell away, there will be this beautiful marbling on the egg and on the shells. SO COOL!

A picture of the marbled eggshell

Recipe adapted from Jaden Hair and Diana Kuan

Thursday, April 9, 2009

Good Old Butter Tart

Hello,

Butter tarts are one of Derek's ultimate favorite comfort foods. I was leaving for the entire weekend last week, and so before I left, I made these for him at midnight!! Crazy, I know. I did not make my own tart dough (shameful), but there was no way that I was going to do that at 12AM. The raisins that I had were gigantic, organic, and super sweet, and i think that made the tarts very special.


12 unsweetened tart shells
1/2 cup brown sugar
1/2 cup corn syrup
1 egg
2 tbsp of butter or margarine
2 tsp vanilla
1tsp white vinegar
pinch of salt
1/4 cup raisins (the best raisins you have)
1/8 cup of chopped walnuts
  1. Preheat oven to 450 F
  2. Place shells on a baking sheet and place raisins and walnuts in the bottom of each shell
  3. Whisk all remaining 7 ingredients until well mixed. mixture should be thick and gooey
  4. poor mixture evenly in the shells & bake for 12 minutes. DO NOT OVERBAKE!
  5. Let tarts cool to room temp, the filling will set. ENJOY! We tried ours at 1 in the morning. Couldn't resist.
Interesting note: Used to prevent discoloration, sulfur dioxide is a common addition when processing dried fruit. The chemical destroys vitamin B-1 (a.k.a. thiamine)... If you want to get the most out of dried fruits, buy them organic and sulfur free. They may not look as pretty, but they are definitely the yummiest!!

Monday, April 6, 2009

Red Bean Chili

Hello everyone,

I got this chili recipe from one of my favorite food blogs: Smitten Kitchen. I check up on this blog every week. Deb (the writer) always has fantastic dishes and beautiful pictures to show. This was the first dish that I tried from the blog, and it was very delicious! My horrendous picture here cannot justify the goodness of this chili... Check her blog out for better pictures!!


2 to 2 1/4 pounds lean ground beef or turkey
1 large onion, chopped
5 cloves garlic, minced
1 cup canned beef broth
1/3 cup chili powder
1 tablespoon ground cumin
1 tablespoon unsweetened cocoa
1 can diced tomatoes (14 1/2-ounce)
1- 1.5 cans kidney beans (15 1/2-ounce), drained
1 teaspoon salt
1 tablespoon cider vinegar
Tabasco to taste

  1. Place a large saucepan over medium-high heat. Add the beef or turkey and cook until browned, about 5 minutes.
  2. Add the onion, stirring well, and cook until translucent, 3 to 5 minutes. Add the garlic and cook 1 minute more.
  3. Gradually add the broth, scraping up any browned bits from the bottom of pan.
  4. Stir in the chili powder, cumin, cocoa and tomatoes. Reduce heat to medium-low, cover, and let simmer for 10 minutes. Add the beans, salt, and vinegar, stirring well. Simmer uncovered for 10 minutes more. Add Tabasco, if desired.
  5. Top with whatever you like (Deb recommended: cheddar, sour cream, and jalapeno). Serve hot!!
Recipe adapted from Smitten Kitchen

Saturday, March 28, 2009

Sichuan noodles with cool cucumber

Hi all,

This was something that I just whipped up with the leftover roast chicken (see below). I just used whatever veggies that we had in the fridge, so if you don't have the exact set of veggies that match my recipe, don't worry about it. The sauce I used is Lee Kum Kee's Sichuan Spicy Noodle Sauce.

It is not super spicy but has a nice flavour, it also can be used as a dipping sauce. the sauce, along with the egg noodles, can pretty much be found in any Asian supermarket. The cucumber added a nice touch to the dish, it was really refreshing to have. Enjoy!!


1/3 English cucumber, cut into thin slices
2 chicken breasts, cooked and shredded
1/4 cup green onions
1 tbsp garlic, minced
1/2 cup shitake mushrooms, sliced
1/2 cup napa cabbage
2 tbsp sesame oil
2 tbsp suchuan sauce
2-3 rounds/bundles of eggs noodles
Few sprigs of cilantro, chopped
salt and pepper
  1. Bring a big pot of water to boil, add salt and throw in the egg noodles for about 5 minutes. Once the noodles are done, pour into a strainer and rinse with cold water.
  2. Heat sesame oil in a large skillet, add green onions and garlic. Saute for a minute.
  3. Stir in mushrooms, napa cabbage and chicken. Stir and heat through.
  4. Add the egg noodles, make sure that all the ingredients are mixed well into the noodle
  5. Add 2 tbsp of the sauce, mix well. Adjust taste with salt and pepper, or more sauce if you like it to be spicier.
  6. Pour the noodles into a bowl, top with cilantro and cucumber slices.

Tuesday, March 24, 2009

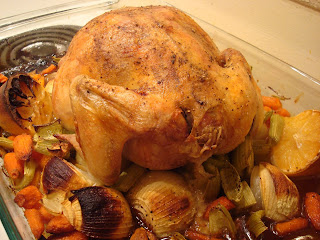
Simple roasted chicken

Hello!

So the grocery story near our apartment had a "Dollar day" extravaganza. Whole chickens were on for 1 dollar a pound! WOOT WOOT! I have been very busy in the past few weeks and I really don't have much experience with roasting chickens, but this recipe was uber simple and the chicken turned out absolutely delicious! If you are a newbie cook like me, this is a great first dish to try.


What you will need:

1 whole chicken (~ 3 lb)
4 carrots, peeled and roughly chopped
4 stalks celery, chopped
3 medium yellow onions, peeled and cut in half
4 tbsp olive oil
1 tbsp dried thyme
4 tbsp freshly squeezed lemon juice
Sprinkled sea salt and freshly ground black pepper, to taste

  1. Preheat your oven to 500°.
  2. Rinse the chicken thoroughly with cold water and remove any giblets from the cavity. Dry well. Clean and sterilize your sink.
  3. Toss the carrots, celery and onions into the bottom of a roasting pan large enough to comfortably hold the chicken. Toss with the olive oil and season with salt and pepper.
  4. Place the chicken on top of the vegetables and sprinkle with some more olive oil, as well as the lemon juice.
  5. Season the chicken evenly with salt, pepper and thyme and place in the preheated oven.
  6. Immediately turn the oven temperature down to 350° and roast that bird for about 1.5 hrs, or until an internal thermometer registers 165° when jabbed into the deepest part of the leg.
  7. When it's done, pull the pan from the oven and let the chicken rest for a few minutes. Serve warm with the veggies.
  8. Save the chicken carcass!! Place the reserved carcass in a large pot and cover with cold water. Add some carrots, celery and onion and bring to a simmer, removing any debris that floats to the top. Leave it at a gentle simmer for an hour and then strain it into a clean container. Refrigerate.
Enjoy!
Annie

Ps - for the very observant people out there, you may have noticed that my chicken was roasted with the wrong side up. I only realized this when I went to cut the breast out, and was at first quite confused because I could not find it...how embarrasing. Can you tell I am new at this?

Sunday, March 22, 2009

Greek potato and spinach salad

Hi everyone!

I made this dish last Sunday night and it was a big hit. The original recipe called for a lot more butter and oil than I actually used, but I think even the amount that I used was a bit too much and I would continue to cut it down next time. If you don't like the whole spinach feel, just cut it out of the recipe and it will still be a fabulous Greek potato dish.

As a side note, don't bring this dish to work, the garlic will stink up your entire office and make you smell like garbage. Not very attractive.


Here is what you will need:

1/4 cup olive oil
1/2 Stick butter or margarine(4 tablespoons)
6 Yukon Gold potatoes, cut into 1 inch pieces
1 head of garlic, peeled into cloves
2 lemons, juiced and zested
1/4 cup more of olive oil
1 tbsp dried oregano
10 oz baby spinach
Sprinkled sea salt and freshly ground black pepper, to taste

  1. Place a large, heavy skillet over medium-high heat and add the first olive oil and butter.
  2. When the butter has melted and begins to sizzle, add the potatoes and brown slowly and patiently for 15-20 minutes, turning them as necessary until they have evenly browned on all sides. Set aside on paper towels
  3. Meanwhile finely chop or puree the garlic.
  4. Whisk the lemon, second olive oil, garlic and oregano into a small bowl and whisk until emulsified.
  5. Put browned potatoes into a salad bowl and toss with garlic dressing, salt and pepper and spinach.
Recipe adopted from Michael Smith, Food Network

Sunday, March 15, 2009

Yes...another chocolate chip cookie recipe

I know I know...

It seems like the only thing that I know how to bake is chocolate chip cookies, but the batch that I made this weekend was SOOOOO good, I had to share it! I found this recipe on Canadian Living, and gave it a try. It was amazing! Derek ate 8 of them in one sitting....

Now, if you are determined to make these cookies, you must not skimp on any of the ingredients. Don't try to cut the butter down or cheap out on the chocolate chips. A few more tablespoons of fat won't kill and will makes a world of difference in these cookies!! And honestly, if you are making chocolate chip cookies, no matter how you look at it, you are not eating the healthiest thing in the world. So just embrace it!


Here is what you will need:

1 cup unsalted butter, room temp
1 cup granulated sugar
1/2 cup packed brown sugar
2 eggs
1 tbsp vanilla
2 3/4 cups all purpose flour
1 tsp baking soda
1/2 tsp salt
2 cups semisweet chocolate chips
1 cup chopped walnuts

  1. In bowl, beat butter and gradually beat in granulated and brown sugars until smooth. Beat in eggs and vanilla.
  2. In separate bowl, whisk together flour, baking soda and salt, and stir into butter mixture. Stir in chocolate chips and walnuts. (At this point, the dough may look dry, just throw the wooden spoon away and use you hands to mix, the dough will soften up)
  3. Cover bowl and refrigerate for 30 minutes.
  4. Drop by rounded tablespoonfuls, about 2 inches apart, onto parchment paper–lined or greased rimless baking sheets.
  5. With the spoon, flatten to 1/2 inch (1 cm) thickness.
  6. Bake in 350F oven for 8-10 minutes or until edges are golden and centers are still slightly underbaked. Let cool on pans on racks for 3-5 minutes.
  7. Transfer to racks; let cool completely.
  8. Make-ahead: Layer between waxed paper in airtight container and store at room temperature for up to 5 days or freeze for up to 2 weeks.
Recipe adopted from Canadian Living